Unearthing the Bones of J. Giggles Flintstone

This week I had to work on a commission, and since it aligned nicely with the usual cartoony-spooky-vintage stuff we cover on our YouTube channel, we recorded my process. The medium is colored pencil, and the subject of the commission is the late J. Giggles Flintstone, a minor Season Five character who bequeaths Fred his entire fortune, on the condition that he stays one night in the old, haunted Flintstone estate. See? Told you it fit right in with our other videos.

The video isn’t just a rundown of my process, though. Michelle and I also discuss the episode in question, A Haunted House Is Not A Home, and recap it for anyone who might not instantly recall the 60-year old cartoon. It’s one of our favorite episodes, due in no small part to the malevolent staff who are also spending the night at the mansion, Creepers, Potrock, and Wormstone. If you think they look a little shady, keep in mind that should anything happen to Fred during the night, these stone-age weirdos get the fortune to themselves. Now, it’s a party!

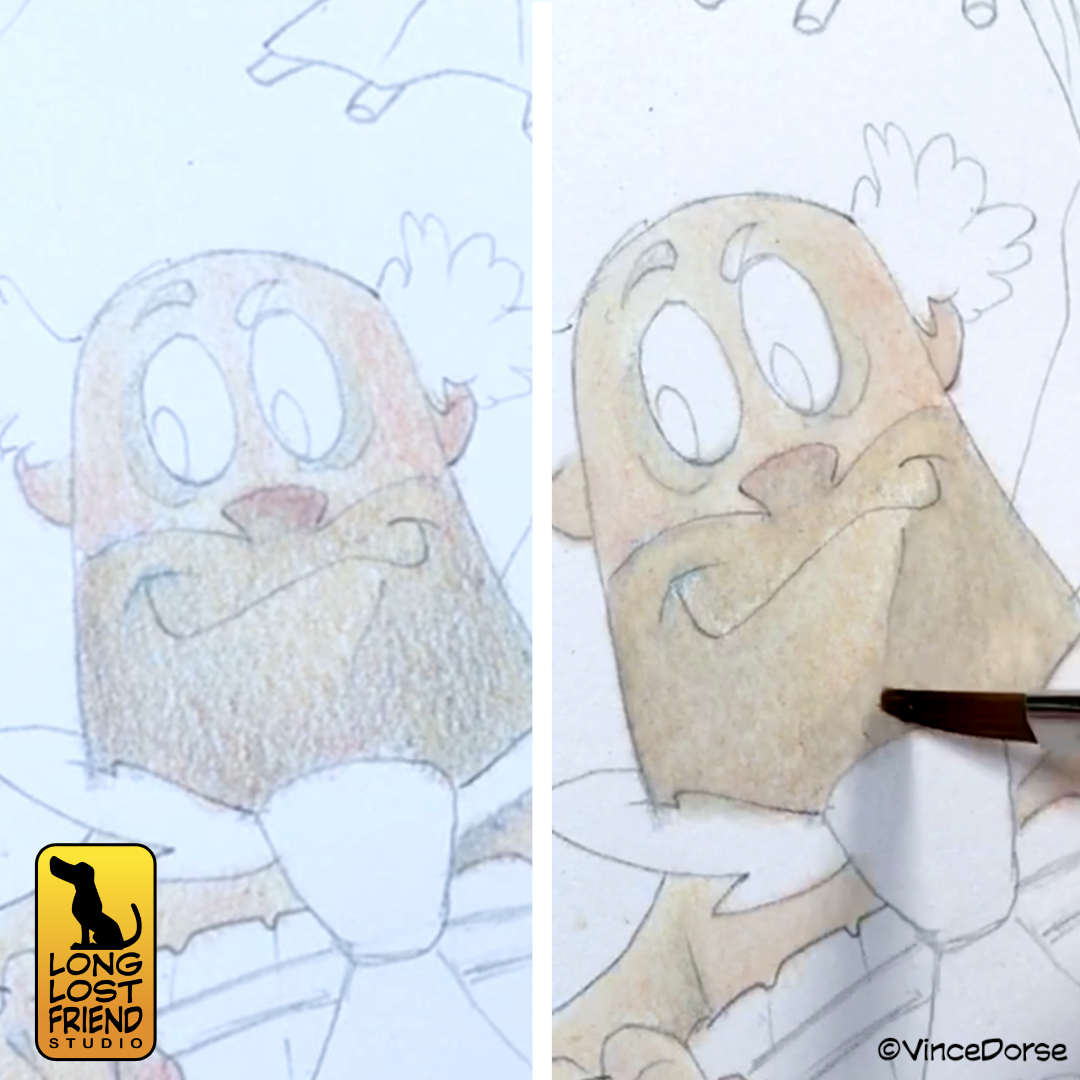
The Flintstone commission is only the second time I’ve tried using solvent with colored pencil. It was a special request by the client, and I was happy to give it another try. And, as usual, in the spirit of passing on any knowledge we acquire by trying these things, I try to drop as many tips as I can think of while I work.

If you haven’t seen how solvent smooths out the texture of colored pencil, it’s really kind of magical. The colored pencil pigments are carried in the wax core of the pencils. When the mineral spirits of the solvent are brushed onto the wax, it melts, releasing the pigments. The result is a much smoother blend of colors.

If you’d like to see more of this solvent effect, you can check out our original Velma and Black Knight video from 2022. And if you want to know if Fred makes it through the night alive, you can watch this week’s Flintstones video at the link below.

Taking A Run At Scooby-Doo’s Ghost Clown

The comedy-themed project streak continues unabated this week as Michelle and I each take a turn at rendering the classic Scooby-Doo villain, Ghost Clown. And everyone knows there’s nothing funnier than a clown who could swallow you whole.

The clown first appeared in episode 10 of the first season, Bedlam In The Bigtop. I’m guessing the original clown design was done by Iwao Takamodo, since he handled most of the designs for those early Scooby-Doo episode. His design was tight and perfect for the show, and looked like this:

I love that clown. But I wanted to try to make him a little scarier. So, after a few sketches, I landed on a slug-like monster with two-rows of razor sharp teeth. I lightboxed my digital sketch, and inked it with Microns, Tombow Brush Pens, and some brushed inks.

The wash I use is just water and Dr.Ph Martin’s Black Star ink. I keep a few pre-mixed jars of it so I don’t have to work out the ink-to-water proportions every time I sit down to do a wash. Once all of that ink is dry — all of it waterproof — I put down some nice, bright, circus colors that echo the original Scooby-Doo design.

And in addition to my version of the clown, this week Michelle plays another round of Ink It or Stink It where she tries to ink one of my drawings for a panel of judges. I sketched out the original Takamodo design for her to try her hand at, and members of our Patreon voted whether the final outcome was an “ink” or a “stink.”

If you want to see the process video, and hear us talk about Bedlam In the Bigtop, the video link is below.

Runaway Brain Mickey Captured On Canvas

Recently, Michelle and I went on a wild goose chase for an amazingly entertaining ’90s-era Mickey Mouse short called Runaway Brain. I wanted to paint the Mickey-monster from the cartoon, and I needed reference. But what we discovered was that Disney had all but buried the short in out-of-print vhs/dvd media, and wasn’t airing it on Disney+ either.

Over on our studio blog, you can read a very brief history of why Disney shuns this cartoon much the way Dr. Frankenstein shunned his monster. But the good news is, after weeks of searching in vain, Michelle and I realized we already had access to this short as part of a DVD/Blu-Ray set in our collection. It’s alive!

To find out where Runaway Brain may (or may not) be available, and to watch me hack out Disney’s most terrifying monster in acrylic on canvas, you can watch our video. But be warned: This is the kind of monster that would eat the Mickey Mouse Club for breakfast.

How To Draw A Cartoon Cat

We move from 3D witch sculpting to 2D cartoon drawing this week. A simple How-To-Draw tutorial that’ll take you through the steps of drawing this cute little cartoon cat.

This is more or less a recreation of a short presentation I did with some girl scouts over a zoom conference troop meeting. I had to do a “how to draw” segment, and this cartoon cat was what I decided to use. I worked digitally (in Clip Studio Paint) but the exercise could be done with pencil on paper as well.

I tried to keep it pretty basic — simple shapes, not too detailed — and if you follow along, yeah, in the end, there should be a cat on the page (or monitor) in front of you. But from that starting point, you can experiment, change, alter, or even forget everything in this lesson, and create a cat that’s personal to you.

It’s a pretty short video, and easy to follow. Hope you have fun! -v

Inking Prince John (from Disney’s Robin Hood)

There’s this middle-era of Disney animation that I just love. One of the movies from that era is Disney’s Robin Hood.

The villain of that movie is the scheming Prince John, a lion (and lyin’) king that’s a pretender to his brother’s throne. But, as conniving as he is, he’s actually a pretty funny Disney villain.

So I inked him with a brush pen and finished with some ink washes, while RunRedRun and I discussed Disney movies and what we liked so much about the art style in Robin Hood. Here’s the video:

Inking Raphael (for a Teenage Mutant Ninja Turtle Commission)

I like turtles. Do you like turtles? Everyone likes turtles.

Raphael_process01

Despite that, I’d never really drawn a Teenage Mutant Ninja Turtle until a client commissioned one as part of a group project where 4 different cartoonists contributed a different turtle. I got Raphael.

Raphael_process02

I had fun with it. And I had fun talking with RunRedRun about ninja turtles, inking, and the renaissance. Here’s the video if you’d like to listen in:

Inking and Coloring Scooby Doo’s Captain Cutler and Trying Out Neon Markers

Had a little fun with another Scooby Doo villain. This time it’s Captain Cutler, the creep in the glowing diving suit that chases the gang around Rocky Point Beach.

I inked him with Sakura PIGMA Brush Pens, and colored him with some Copic Markers and Winsor and Newton Neon Markers that I ordered just for this little project.

And while I do all that, Run Red Run and I talk about markers, old-time diving suits, and that one time I went fishing. Here’s the video.

Making a Maze in Clip Studio Paint (for the National Cartoonists Society Activity Book))

I’m no mazologist (is that a word?), but I was asked to create a puzzle page for the National Cartoonists Society Activity Book. If I had to do it on paper, I might still be working on it. But Clip Studio Paint made it easy and quick. Oh, and I’ve added a link at the bottom letting you know where to download your own copy of the activity book!

Inking

This maze is packed with illustrations of my Untold Tales of Bigfoot characters. And since I know how to draw those guys, that’s where I started. I sketched in their shapes roughly in digital pencil, then used the Layer Color function to turn that sketch a light blue.

Then, on another layer, I inked with a brush tool. Doing it this way is low pressure since I can fix errors on the fly and get the work done much faster than I’d be able to with ink on paper.

Halftone Greys

Since this activity book will be a black-and-white publication and not color, I use Clip Studio Paint’s halftone dot patterns to add screen tones. The first step is to create a selection of where you want your dot pattern.

Then, from the pop-up menu, select the second-to-last option, New Tone. This brings up another pop-up that gives you options on the density and type of dot pattern you’d like to drop into the selection.

Once you pick one, click OK and the pattern appears on another layer, in a MASK that you can add to or subtract from— giving you the option to paint in (or remove) the dot pattern with ease.

Curve Rulers

Again, I’m not a maze-maker. So it took me a few (dozen) tries to digitally pencil out a path for Scout to take through the woods in his quest for Bigfoot. Doing it digitally made it easier to start over when I screwed up. But once the paths of the maze were set, I clicked the Layer Color option so I could turn the pencils blue and ink over them on another layer.

The lines of the maze aren’t ramrod straight or particularly smooth curves, but I used the Curve Rulers anyway because, besides helping you follow a designated path, they also help you keep a consistent line weight.

Drawing these lines freehand would’ve resulted — for me, at least — in inconsistent, bumpy lines that wouldn’t look very good. The Curve Ruler helped make the lines smooth and evenly weighted, but with a natural, hand-done feel.

Text Tool

For very simple typesetting like adding a title to this page, the Text Tool in Clip Studio Paint is a breeze. Just grab the text tool, plant the cursor where you want your text, and type it out. You can resize with the point size dropdown, or just grab a corner of the bounding box and stretch it to fit.

Eventually I used the font dropdown to change the font into something I thought fit better.

Finally, I used the Rounded Balloon tool in conjunction with the Text Tool to give Bigfoot and Scout something to say.

So that’s about it. Nothing too difficult. Just some very simple tools in Clip Studio Paint that make a relatively basic job a little easier and a bit quicker.

Now, the NCS Activity Book is packed with all kinds of puzzle pages from some of the most well-known cartoonists in the world: Sergio Aragones (MAD Magazine), Mo Willems (Don’t Let The Pigeon Drive The Bus), Jeff Keane (Family Circus), Jerry Scott and Jim Borgman (Zits), and many more. The pdf download is a pay-what-you-can deal of a lifetime and the proceeds go toward the NCS Foundation. You can find out more about that in this video as well as watch me put this Untold Tales of Bigfoot Maze together in Clip Studio Paint.

Inking Ratigan (from The Great Mouse Detective) and Talking About Vincent Price

The title pretty much covers it. I inked another Disney Villain — this time, the insidious Professor Ratigan from The Great Mouse Detective.

Ratigan_process01

And, if you’ve seen the movie, you’re well aware the character is voiced by the amazing Vincent Price, one of the great horror actors of the 20th Century.

Ratigan_process02

So Run Red Run and I used my inking practice as an excuse to talk about our favorite Vincent Price movies. Here you go:


Coloring Bluto with Colored Pencils

Do kids in this era even know who Bluto is? Doesn’t matter. They know what bullies are. And Bluto’s the quintessential archetype of a classic bully. Bluto_colorscrop

Run Red Run and I talk a little about Popeye, the Bluto/Brutus name switch, and about my eleventh hour decision to try crosshatching with colored pencils. Honestly, I didn’t even plan on finishing this doodle. But it is what it is and I am what I am.