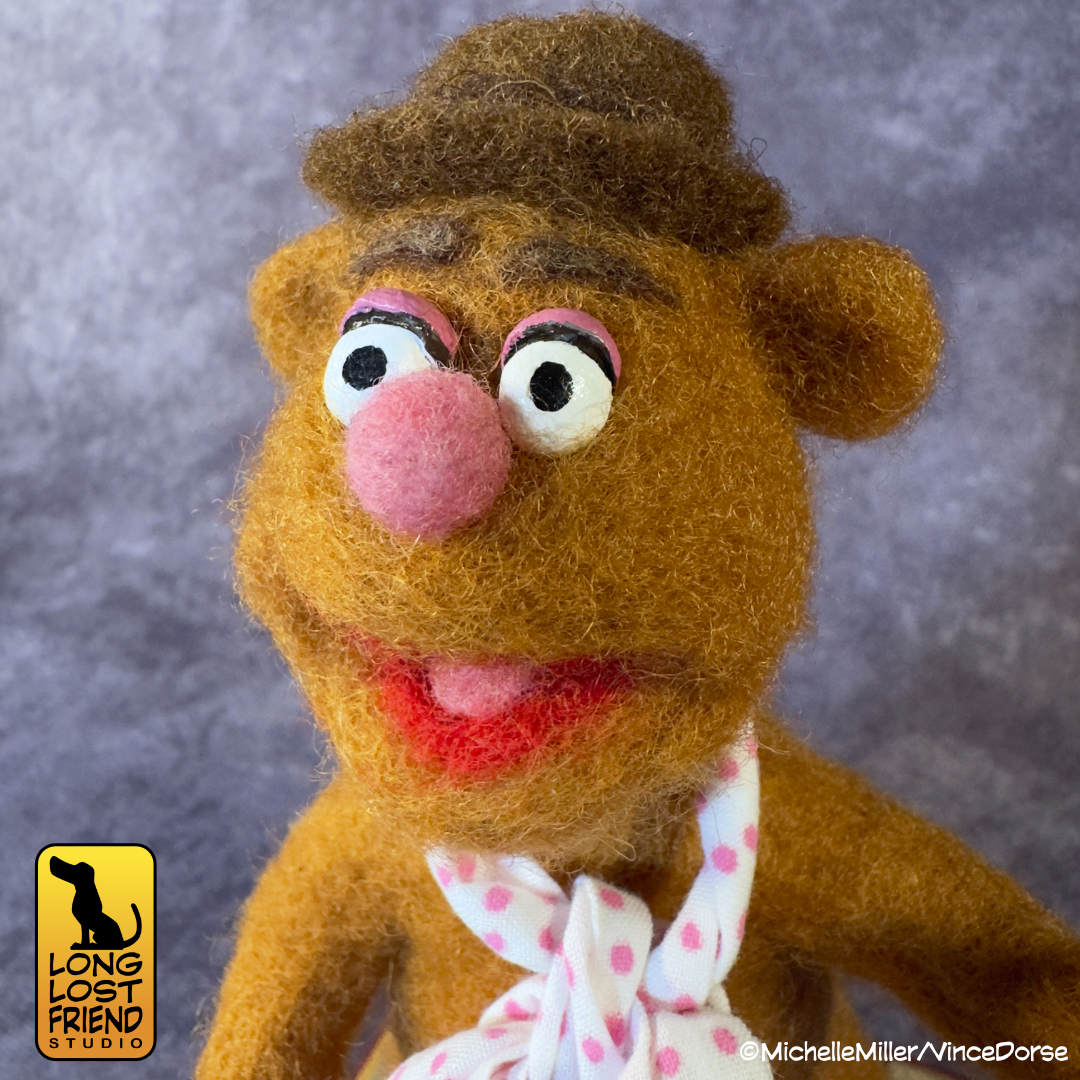
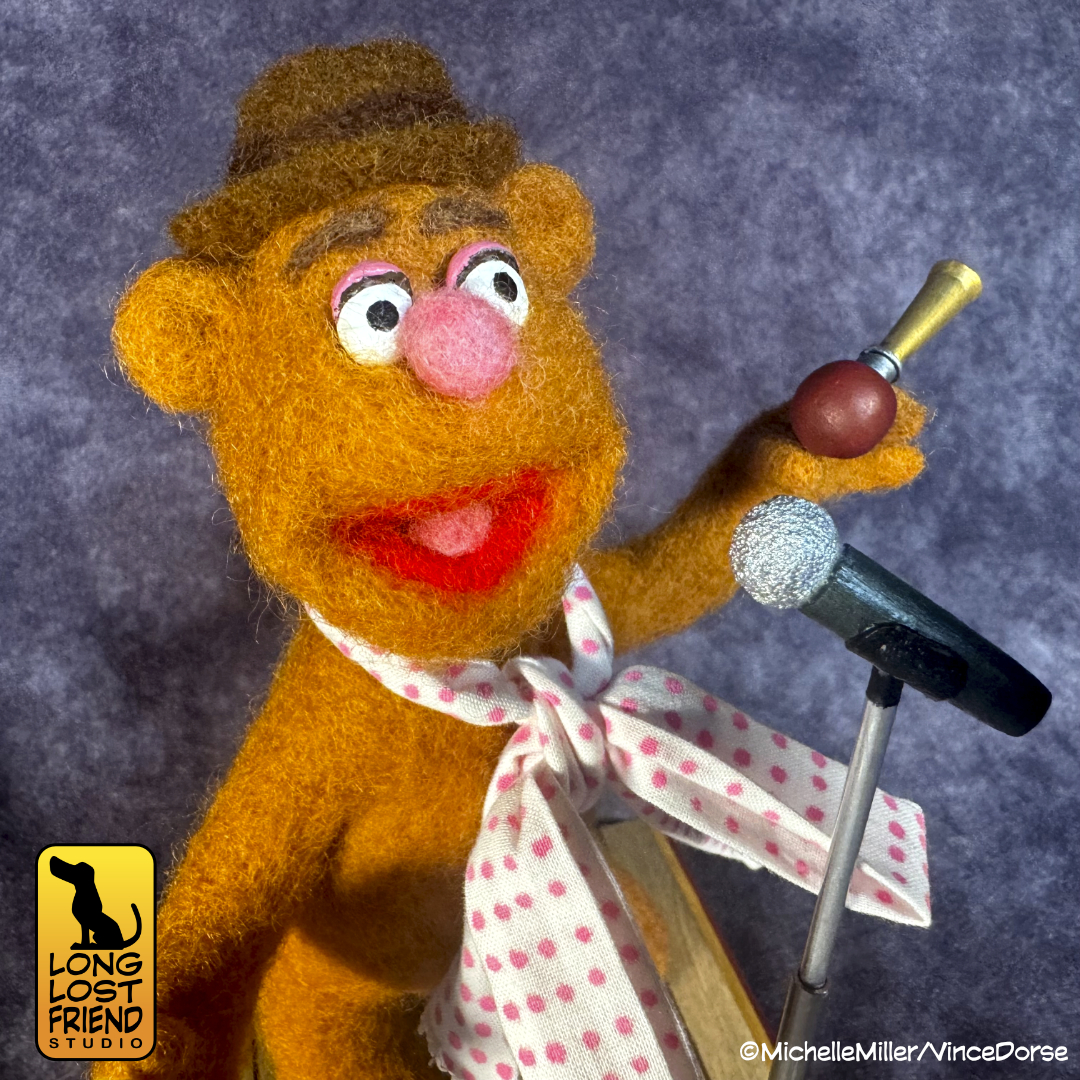
I’m the first one to admit, Michelle did most of the heavy lifting on this week’s project, A Fozzie Bear mini-diorama that’s part of Gallery1988’s latest show, Off The Leash, a celebration of our favorite non-human characters from pop culture.
We called the piece “Wocka Wocka” and it’s something we’ve wanted to do for a while; A tribute to Fozzie the comedian. It’s a simple tableau of everyone’s favorite comedy bear, up on stage, with a microphone and some props, doing what he does best — telling jokes.
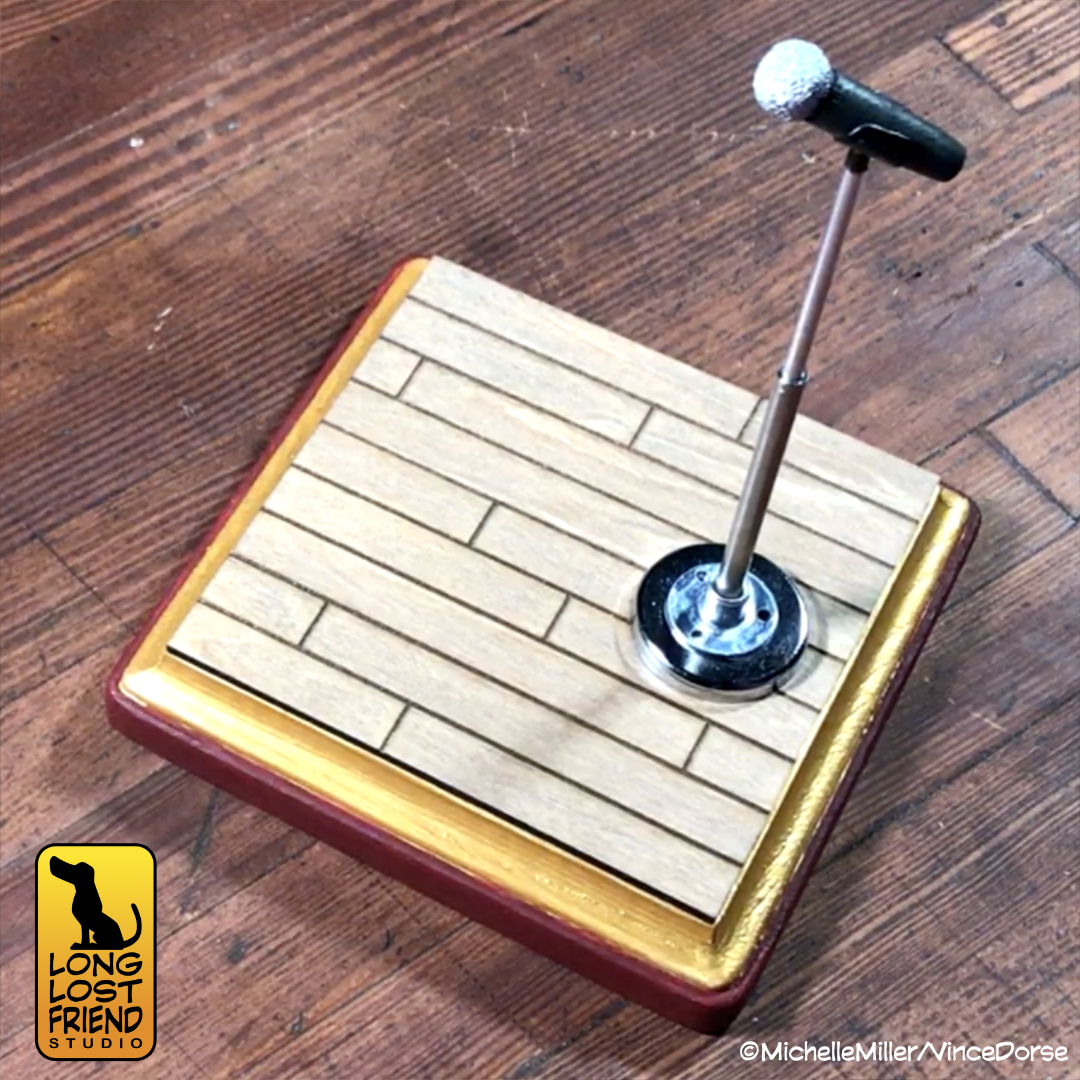
So while Michelle was busy needle felting our fuzzy friend, I set about figuring out how to make the rest of the piece. I started with the microphone (arguably, his main prop). To cut, drill, and grind the metal parts of the prop, I ended up utilizing the Dremel Workstation Michelle got me for Christmas. It’s a pretty invaluable accessory to my rotary tool and I couldn’t have finished my part of this project without it.
The grip of the mic is a piece of wood I sanded down into that slightly flared profile. Then I used my Dremel and a sphere-shaped burr to scoop out a concave bowl shape in the end. That way I could securely glue in the head, which I’d sculpted out of clay and textured with a stiff brush.
And while Michelle’s Fozzie sculpt is clearly the star of the show here, I gotta say I’m pretty proud of the stage he stands on and the props he uses. Also — little known fact — I was the one in charge of drawing the eight-hundred-or-so dots on Fozzie’s tie.
To see Fozzie and the rest of the pieces in Gallery1988’s Off The Leash exhibit, click here.
And if you’d like to see Michelle and I put together our tribute to this comedy legend, you can watch the video below.
You can ignore the Simon & Garfunkle reference in the title. Sometimes I reach. But considering the number of zombies, mummies, and Frankenstein-types in the Disney Channel Original Movie, Halloweentown, it’s not too far off.
The diorama Michelle and I worked on this week, however, features a character from the movie that is definitely alive. In fact, they’re thriving like a pumpkin in early October. Because it is a pumpkin. A pumpkin person who appears in the movie for no more than three seconds, but quality, as you know, is more important than quantity.
I sculpted the little pumpkin kid out of Cosclay. I rely more on that lately than the Sculpey because I’ve dropped both and the Cosclay pieces tend to be a bit more durable.
Michelle worked on the base of this diorama, virtually recreating the town square in Halloweentown where we first see pumpkin kid.
It probably goes without saying, but it’s always Halloween in Halloweentown. So the town square is festooned with jack-o-lanterns and straw. So that’s what we did. Some wood for the picket fence, some soil and turf to cover the ground, and some scattered straw was all Michelle needed to set the scene.
Then she sculpted a jack-o-lantern to keep my pumpkin kid company.
In the end, I think the piece breathes some life into a character that may have been forgotten back in Hallowentown. And since the movie was a Disney Channel staple in the 1990s, we thought we’d give it the whole ’90s mid-west mall, glamour shots treatment. I can practically smell the Cinnabon.
Take a look at the video below to see our process.
Today is Paul Williams’ birthday. If you don’t know who he is, you’re missing out. Musician, composer, actor…Paul Williams has had a dazzling and diverse career in show business for over five decades. But for me, the most impressive achievement he ever racked up was working with The Muppets.
Williams, along with Kenny Ascher, wrote the timeless classic, Rainbow Connection, and all the other amazing songs from the first Muppet Movie. Williams also penned all the tunes from the holiday classic Emmet Otter’s Jugband Christmas. If you’ve ever found yourself humming Barbecue at the holidays, you can thank Paul Williams. Years later, the Henson company picked him to create the songs for yet another Muppet holiday classic, The Muppet Christmas Carol.
Considering how important Williams is to the Muppets, Michelle and I decided to honor that collaboration (and his birthday) with an illustration of Williams jamming on-stage with some of our favorite Muppet musicians.
That means that he’ll be performing not only with the Frogtown Hollow Jubilee Jugband from Emmet Otter’s Jugband Christmas, but also the powerhouse rock band The Electric Mayhem who shook the rafters in The Muppet Movie.
He’ll also be joined by Rowlf on piano and, of course, Kermit the frog on banjo. But a performance this massive couldn’t be confined to just the paper it’s printed on. So Michelle and I decided to craft a sufficiently Muppety frame to showcase this band.
We wanted the frame to evoke the proscenium arch of the old Muppet Theatre. A throwback to vaudeville days, the Muppet stage was framed in rich, dark red wood with ornate gold accents. So Michelle and I set about finding all of the parts and pieces necessary to complete that visual.
That meant finding and painting a wooden frame and accents, right down to the seashell footlights. The overall effect when looking at the image is that you’re viewing a Muppet performance on a stage, in a classic, old-style theatre with, of course, Paul Williams front and center.
To see us put both the illustration and frame together — and to hear us gab about Paul Williams’ many artistic accomplishments for six solid minutes — you can watch the video below.
I recently received a book filled with Mary Blair’s concept art for Disney and spent an hour flipping through all the amazing illustrations. It was a crash course in how to effectively use color and composition to tell a story.
The image above is from her concept artwork for The Adventures of Ichabod and Mr. Toad, a classic Disney feature and an annual watch around here near Halloween.
The book is filled with images like this, and, since Blair worked mostly in gouache and watercolor to create these images, it inspired me to try gouache for the first time. There’s a bit of a learning curve since this medium sits somewhere between acrylics and watercolors…and I consider myself a novice at both.
But, since experimenting is what we do around here, I pressed on. I started with a basic gradient blend, something Blair relied on heavily in her concept art. And while you can use gouache much like watercolor — diluting it and layering translucent washes — I tried to use it the way Mary Blair did in her illustrations: just enough water to create a loose but creamy texture that glides over the paper and remains satisfyingly opaque.
I ended up doing four separate paintings. Practice makes progress. Because Blair and her work for Disney was my inspiration, I stuck mostly to Disney ghosts. Doing a couple from the Haunted Mansion, and even my own take on the Headless Horseman.
For my first attempt with gouache, I was pretty happy with my results. But a lot of that was due to the gouache and how, even when the paint dried to a dead flat finish, the colors stayed vibrant and alive. I can’t wait to try it again and see what else I come up with.
The Haunted Mansion movie opens this weekend, so I may get out of the heat and into an air conditioned recliner to see if inspiration strikes again. And if you’d like to see my first-time gouache experiment, there’s a link to this week’s video below.
Couple of weeks ago, Michelle and I were racing to meet a deadline for a gallery piece but still needed to upload some sort of video to YouTube. That usually means I need to crank out some quick, 2D art and, hopefully, learn and grow a little during the creative process. Enter, Hector Rivera from Pixar’s Coco.
Hector is one of my favorite characters and, like I said, I needed to practice my colored pencil rendering. So I sketched Hector in pencil, and started layering in colors with my Prismacolor Premier colored pencils.
One of the things I wanted to work on is my blending. You can do it a few different ways. Layering color over color over color, of course. But once you have those color layers, maybe you’d like to smooth them out a bit. That’s where mineral spirits come in. You can brush those on and they act as a solvent, blending the colors even smoother.
You can also blend with a light-colored pencil, burnishing all the layers beneath into a smoother texture. I’m no expert. So I still have to work on this stuff. But that’s the benefit of cranking out a character sketch for a YouTube video. I get to practice and I end up with a fun piece of art.
Sharpened up the pencils for the final details — the decorations on Hector’s skull — and I’m about done. If you’d like to see me work on this from start to finish, the link to our video is down below.
Recently, Michelle and I went on a wild goose chase for an amazingly entertaining ’90s-era Mickey Mouse short called Runaway Brain. I wanted to paint the Mickey-monster from the cartoon, and I needed reference. But what we discovered was that Disney had all but buried the short in out-of-print vhs/dvd media, and wasn’t airing it on Disney+ either.
Over on our studio blog, you can read a very brief history of why Disney shuns this cartoon much the way Dr. Frankenstein shunned his monster. But the good news is, after weeks of searching in vain, Michelle and I realized we already had access to this short as part of a DVD/Blu-Ray set in our collection. It’s alive!
To find out where Runaway Brain may (or may not) be available, and to watch me hack out Disney’s most terrifying monster in acrylic on canvas, you can watch our video. But be warned: This is the kind of monster that would eat the Mickey Mouse Club for breakfast.
I haven’t posted here for a while because we’ve been very busy building the new website and recording videos for the Long Lost Friend Studio YouTube Channel. But I still get a bunch of likes on this blog so, out of respect for the nice people that come here, I will try harder in the future to post here more often.
These first few posts will likely be a recap of some of the fun projects we’ve tackled in the last year. And what better way to make up for lost time than with this massive, four-part build that progressed from a watercolor painting to a giant Disney Pirates of the Caribbean diorama!
Part One: The Watercolor
The first ride I ever got on at Disney was Pirates of the Caribbean. As a kid, the environment and characters completely overwhelmed me, while zeroing in on my love of horror. I’ve loved that ride ever since.
So, when planning a new watercolor piece, I naturally reached back to my inner ten-year old for inspiration.
This is still a process blog, so I’m dropping some images of my process. I inked the skeleton pirate with a brush, then laid down some watercolor.
I ended up finishing the piece with some colored pencil detail. If you want to watch the whole thing, you can check out our video here:
Part Two: Monsterizing A Halloween Decoration
We had so much fun working on that watercolor, that we decided to take the project into the third dimension. We bought a five dollar plastic skeleton, and went at it with knives, glue, and paint to weather it.
We used leather, fabric, and wool to complete the effect To see the entire process, you can check out this video:
Part Three: Wheel of Progress
At this point, with the helmsman figure turning out so well, we started thinking maybe we should build a prop for him to complete the idea of his vignette in the Pirates of the Caribbean ride. We thought that if he just had his ship’s wheel to hold onto, he’d look pretty convincing. So we set out to re-invent that wheel.
For this project, we worked with foam, which we were accustomed to. But we also tried molding and casting in resin for the first time. If you want to see how the ship’s wheel came together, the video is right here:
Part Four: Dead Man’s Cove
Once the wheel was complete, there was no turning back. We decided to go for it and create an entire diorama of the Dead Man’s Cove vignette from the Pirates of the Caribbean ride.
The biggest hurdle to jump was size. Since we hadn’t planned on a diorama at the start, the overall size of it would be dictated by the Helmsman and his wheel. And since they were pretty big, this diorama was going to be huge. The base was wood and plaster, but for the craggy rocks of the cove we went back to our old stand-by, foam.
In the ride, the Helmsman is standing atop a ruined deck of a shipwreck, hanging on to the wheel, while the waves crash below him on the jagged rocks of the cove. With the rocks and the surrounding beach sorted, we turned to the deck of the ship. Again, we used foam for the bulk of it, but continued our experimentation with molding and casting for the balustrades.
The Dead Man’s Cove diorama is one of our largest and most ambitious projects to date, and we’re really happy with how it all came together. If you’d like to see how the final diorama turned out, you can watch the video:
Thanks again for visiting this blog. I’ll try to keep up with the posts. If you’d like to see some of our more recent projects, I try to do a regular post on my site blog that covers news, current projects, and process. -v
I know. I inked a Baby Yoda last year. But this one’s better. And it’s all done with brush, no pens (not even brush pens)!
The primary reason I drew this little cutie again is because Run Red Run and I both got Disney Plus (finally) and we’re really enjoying The Mandalorian.
In this week’s video I ink Grogu but, as a special bonus, Run Red Run also plays a round of “Ink It or Stink It” and inks her own Grogu. How’d she do? Gotta watch the video.
This was a fun video to make. And not just because I got to draw one of my favorite scary muppets, Uncle Deadly.
And not just because Run Red Run and I got to talk about Muppets (which is always fun).
But this time, we’re also debuting a brand new experimental segment where SOMEONE ELSE does the inking. Have I got your curiosity piqued? Good. Watch the video and find out what I’m talking about:
I know we usually ink monsters or villains (because they’re fun) but we’re lightening things up a touch today and inking Muppets!
Kermit the Frog and Fozzie Bear, up on stage, thrilling the crowd on open mic night at Chet’s Beef and Brew. Everybody’s gotta start somewhere! But you know with the talent these two have, they’re going places!
And while I ink Muppets, RunRedRun and I discuss inking, kazoos, and that one time we met a Muppeteer! I also spend most of the video trying to convince her to sing.
Plus, if you stick around ’til the end, I tossed some digital color on my inks. Here the video:


You must be logged in to post a comment.